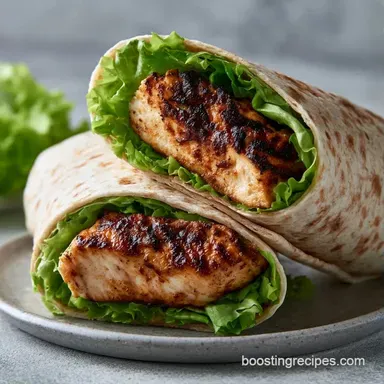
Chicken Wrap: Step by Step Recipe
- Time: 10 min prep + 10 min cook = Total 20 mins
- Flavor/Texture Hook: Warm, savory chicken paired with a cold, velvety Caesar crunch and a toasted, mahogany seal
- Perfect for: Quick weekday lunches, budget-friendly meal prep, or a handheld dinner for kids
- Step by Step Wrap Recipe Guide
- Why These Techniques Actually Work
- The Core Ingredient Breakdown
- The Building Blocks
- From Prep to Plate
- Pro Tips and Common Pitfalls
- Creative Twists and Easy Swaps
- Make-Ahead and Leftover Tips
- Storage and Zero Waste Tips
- Serving Suggestions for Your Wrap
- Recipe FAQs
- 📝 Recipe Card
The sound of chicken strips hitting a hot pan with a loud sizzle is honestly my favorite part of the day. I used to think wraps were just "sandwiches in a circle," and I'd just throw everything in and roll it up. The result? A soggy, leaking mess that fell apart the second I took a bite.
I thought I just lacked "restaurant skills" or needed some fancy equipment to keep them together.
But here's the truth: you don't need a professional kitchen or expensive tools. The only thing I was missing was a strategy for moisture control. Once I figured out the "barrier method," everything changed.
This step by step Wrap Recipe is all about the order of operations, turning a basic lunch into something that actually holds its shape.
We're going to keep this budget friendly. You don't need artisanal greens or imported cheeses to make this work. With a few smart swaps and a quick sear at the end, you'll get a wrap that feels high end but costs pennies per serving. Let's crack on.
Step by step Wrap Recipe Guide
When I first started making these, I'd put the dressing right on the tortilla. Huge mistake. The dressing soaks into the flour, making the whole thing limp. Now, I treat the tortilla like a structural foundation. I keep the "wet" stuff away from the edges and use the lettuce as a shield.
This isn't just about taste, it's about architecture. If you've ever had a wrap that just "unzipped" while you were eating, you know the frustration. By sealing the seam in a pan, we're essentially welding the wrap shut. It's a tiny step that makes a massive difference in how the meal feels.
Whether you're looking for something to pack for work or a fast dinner, this approach works every time. It's a straightforward process, but the precision in the layering is what separates a homemade wrap from a soggy disaster. Trust me on this, the extra 90 seconds of searing at the end is the real magic.
Why These Techniques Actually Work
I've spent way too much time wondering why some wraps stay tight and others fail. It turns out it's not about how hard you roll, but how you manage the ingredients. Here is the logic behind the method:
- The Barrier Method: Placing the Romaine lettuce directly against the sauce prevents the moisture from penetrating the tortilla, keeping the base firm.
- Protein Resting: Letting the chicken sit for 2 mins ensures the juices redistribute, so they don't leak out and soak the veggies.
- The Seam Sear: Applying direct heat to the fold creates a crisp, toasted bond that locks the fillings inside.
- Border Control: Leaving a 2 inch gap around the edges prevents the dressing from oozing out during the rolling process.
Since we're focusing on a budget smart approach, it's helpful to see how different paths affect the result. You don't always have time to make everything from scratch, and that's fine.
| Approach | Time Investment | Texture Result | Best For |
|---|---|---|---|
| Fresh (Full Recipe) | 20 mins | Maximum crunch, balanced flavor | Weekend meal prep |
| Shortcut (Rotisserie) | 10 mins | Softer chicken, faster assembly | Hectic workdays |
| Budget (Frozen Chicken) | 25 mins | Slightly firmer protein | Lowest cost per wrap |
I've found that using the shortcut method is great, but you lose that specific garlic pepper crust we get from sautéing. If you have the 10 minutes, go for the fresh sear.
The Core Ingredient Breakdown
Every ingredient here has a job. If you remove one or swap it without knowing why, the whole balance of the wrap shifts. Here's what's happening inside the wrap.
| Ingredient | Science Role | Pro Secret |
|---|---|---|
| Flour Tortilla | Structural Base | Warm it slightly for better flexibility |
| Romaine Lettuce | Moisture Barrier | Pat dry with a paper towel first |
| Caesar Dressing | Flavor Binder | Use a thick, creamy version to avoid leaks |
| Chicken Breast | Protein Core | Slice into thin strips for faster cooking |
Right then, let's talk about the actual shopping list. I've kept this simple, but I'll give you some alternatives if you're missing something in the pantry.
The Building Blocks
For this recipe, we're using a combination of fresh crunch and savory protein. Make sure your vegetables are chopped uniformly so you get a bit of everything in every bite.
- 450g (1 lb) chicken breast, thinly sliced into strips Why this? Lean protein that sears quickly
- 15ml (1 tbsp) olive oil Why this? High smoke point for browning
- 2.5g (1/2 tsp) salt
- 2.5g (1/2 tsp) black pepper
- 5g (1 tsp) garlic powder Why this? Adds depth without burning like fresh garlic
- 2 cups chopped Romaine lettuce Why this? Sturdy leaf that resists wilting
- 1 cup shredded carrots Why this? Cheap way to add color and sweetness
- 1/2 cup thinly sliced red onion Why this? Sharp bite to cut through the creamy sauce
- 1 cup halved cherry tomatoes Why this? Bursts of acidity
- 120ml (1/2 cup) Caesar dressing Why this? The primary flavor driver
- 30ml (2 tbsp) fresh lemon juice Why this? Brightens the heavy dressing
- 15g (1 tbsp) grated Parmesan cheese Why this? Adds a salty, umami kick
- 4 large (25cm/10 inch) flour tortillas Why this? Standard size for a filling meal
If you're looking to switch things up, you can easily swap the protein or the sauce. For instance, if you want something with a different vibe, try these Asian Chicken Wraps for a zesty peanut twist.
| Original Ingredient | Substitute | Why It Works |
|---|---|---|
| Chicken Breast | Grilled Tofu | Similar texture. Note: Press tofu first to remove excess water |
| Romaine Lettuce | Baby Spinach | Similar nutrition. Note: Less structural support, more likely to wilt |
| Caesar Dressing | Greek Yogurt + Lemon | Lower calorie. Note: Tangier and less salty than traditional Caesar |
| Flour Tortilla | Corn Tortilla | gluten-free option. Note: More prone to cracking; must be steamed |
Keep in mind that substituting the lettuce for something softer, like spinach, means you need to be even more careful with your sauce amount. The crunch of the Romaine is what keeps this step by step Wrap Recipe from feeling like a soggy burrito.
From Prep to Plate
Now we get into the actual assembly. Pay close attention to the timing and the visual cues. If the chicken looks pale, keep it in the pan. We want that golden brown crust.
- Heat the olive oil in a 12 inch non stick skillet over medium high heat.
- Add the chicken strips to the pan and season them immediately with salt, pepper, and garlic powder.
- Sauté for 5-7 minutes until the chicken is golden brown and cooked through. Note: Don't crowd the pan or the chicken will steam instead of sear
- Remove the chicken from the heat and let it rest on a plate for 2 minutes.
- Lay one flour tortilla flat on a clean surface.
- Spread 2 tablespoons of Caesar dressing in the center, making sure to leave a 2 inch border around the entire edge.
- Place a handful of Romaine lettuce over the dressing first. Note: This is your moisture barrier!
- Layer the warm chicken on top of the lettuce, then add the shredded carrots, red onion, and halved cherry tomatoes.
- Sprinkle the grated Parmesan cheese over the vegetables.
- Fold the left and right sides inward, then roll the bottom up and over the fillings, tucking it tightly as you go.
- Place the wrap seam side down in the preheated skillet over medium heat.
- Press gently for 60-90 seconds until the seam is mahogany colored and sealed. Repeat for the remaining wraps.
Chef's Note: If you find your tortillas are too stiff and cracking, microwave them for 10 seconds under a damp paper towel before adding the dressing. It makes them much more pliable.
Pro Tips and Common Pitfalls
The most common mistake I see is overfilling. It's tempting to load in every vegetable in the fridge, but if the wrap is too fat, it won't seal, and you'll have a "wrap explosion" on your hands.
Why Your Wrap Is Falling Apart
Usually, this is a combination of overfilling and skipping the sear. If the tortilla is stretched to its limit, the tension will pull the seam open. Stick to the measurements in this step by step Wrap Recipe to ensure a clean roll.
How to Stop Sauce Leaks
Leaks happen when the sauce touches the edge of the tortilla. By maintaining that 2 inch border, the sauce stays trapped in the center. If you're using a very thin dressing, consider mixing in a bit of Greek yogurt to thicken it up.
Dealing with Sogginess
Sogginess is almost always caused by putting the protein directly on the tortilla. The heat and juices from the chicken soak into the flour. Always use the lettuce as your first layer.
| Problem | Root Cause | Solution |
|---|---|---|
| Tortilla cracks | Too cold/dry | Warm for 10 seconds in microwave |
| Filling falls out | Loose roll | Tuck the bottom tightly before rolling |
| Bland flavor | Under seasoned chicken | Add a squeeze of lemon after sautéing |
Common Mistakes Checklist:
- ✓ Did you leave a 2 inch border for the sauce?
- ✓ Is the lettuce the first layer on the tortilla?
- ✓ Did you let the chicken rest for 2 minutes?
- ✓ Is the seam side down in the pan for the final sear?
- ✓ Did you pat your lettuce dry after washing?
Creative Twists and Easy Swaps
Once you've mastered the basic step by step Wrap Recipe, you can start experimenting with different profiles. The "barrier method" works for almost any filling.
For a different flavor profile, you could swap the Caesar dressing for an Easy Chimichurri Sauce Recipe and use flank steak instead of chicken. The acidity of the chimichurri pairs beautifully with the toasted tortilla.
Wrap Filling Ideas:
- The Mediterranean: Hummus base, grilled chicken, cucumbers, kalamata olives, and feta cheese.
- The Buffalo: Buffalo sauce tossed chicken, shredded cabbage, blue cheese crumbles, and carrots.
- The Vegan: Smashed avocado base, chickpeas, shredded purple cabbage, spinach, and vegan ranch.
If you're making this for kids, I recommend cutting the wraps into smaller "pinwheels." Just roll them up tight, chill them for 30 minutes to set, and slice them into 1 inch rounds. It makes them much easier to handle and looks great in a lunchbox.
Make-ahead and Leftover Tips
Can you make these in advance? Yes, but with a caveat. If you assemble the wraps and put them in the fridge, the lettuce will eventually lose its crunch, and the tortilla might soften.
For the best results, do "Component Prep":
- Cook the chicken and store it in a container.
- Chop all the vegetables and keep them in a sealed bag.
- Keep the dressing in a separate jar.
When you're ready to eat, the assembly takes less than 3 minutes. If you must assemble them fully, wrap them tightly in parchment paper or foil. This prevents them from drying out in the fridge.
Reheating for Maximum Crispiness: Don't use the microwave to reheat a pre made wrap; it will turn the tortilla into rubber. Instead, put the wrap back in a dry skillet over medium heat for 2 minutes per side.
This restores the "shatter" of the toasted exterior and warms the center without ruining the texture.
Storage and Zero Waste Tips
If you have leftover chicken or veggies, don't let them go to waste. Chicken strips can be tossed into a salad or a pasta dish the next day. For the vegetable scraps, like the ends of the carrots or onion skins, toss them into a "stock bag" in your freezer.
Once the bag is full, simmer them with water to make a quick vegetable broth.
Storage Guidelines:
- Assembled Wraps: Fridge for 24 hours (best eaten immediately).
- Prepped Components: Fridge for 3-4 days.
- Cooked Chicken: Freezer for 2 months (thaw in fridge overnight).
Always store your tortillas in an airtight bag. If they start to dry out, you can actually revive them by sprinkling a few drops of water on them and warming them in a pan.
Serving Suggestions for Your Wrap
A wrap is a complete meal, but a few sides can make it feel like a full spread. Since the Caesar wrap is quite creamy, I love pairing it with something acidic or light to balance the palate.
Perfect Pairings:
- Fresh Fruit: A bowl of sliced pineapple or melon adds a sweet contrast to the salty Parmesan.
- air-fried Sweet Potato Fries: The sweetness of the potato complements the garlic heavy chicken.
- Side Salad: A simple arugula salad with a light vinaigrette keeps the meal feeling fresh.
Right then, that's the whole process. By focusing on the layering and that final sear, you've turned a simple lunch into a structural masterpiece. This step by step Wrap Recipe is all about working with the ingredients rather than against them.
Give it a go, and I promise you'll never go back to the "throw it all in" method again!
Recipe FAQs
What ingredients are needed for these chicken Caesar wraps?
Chicken breast, flour tortillas, Caesar dressing, and fresh vegetables. You will also need Romaine lettuce, shredded carrots, red onion, cherry tomatoes, Parmesan cheese, lemon juice, olive oil, salt, pepper, and garlic powder.
How do I make a wrap that doesn't fall apart?
Layer the ingredients using the barrier method. Place the Romaine lettuce down first to act as a shield, preventing wet ingredients from soaking into the tortilla.
Is it true that putting dressing directly on the tortilla is the best way to flavor it?
No, this is a common misconception. Dressing applied directly to the edges soaks into the flour and makes the wrap limp; instead, spread it in the center leaving a 2 inch border.
How to prepare the chicken for the wrap?
Sauté sliced chicken strips in olive oil over medium high heat. Season with salt, pepper, and garlic powder, cooking for 5 7 minutes until golden brown and cooked through.
Are these chicken Caesar wraps a healthy meal choice?
Yes, they offer a balanced mix of lean protein and fresh vegetables. The combination of chicken breast and raw greens provides a nutrient dense alternative to fried options.
How to seal the wrap so it stays closed?
Place the wrap seam side down in a preheated skillet. Press gently over medium heat for 60 90 seconds until the seam is mahogany colored and sealed shut.
Can I use pre-cooked chicken instead of fresh breast?
Yes, pre-cooked strips work perfectly for a faster meal. If you are in a rush, you can use the method in our 10 minute version to save time on sautéing.
step by step Wrap Recipe