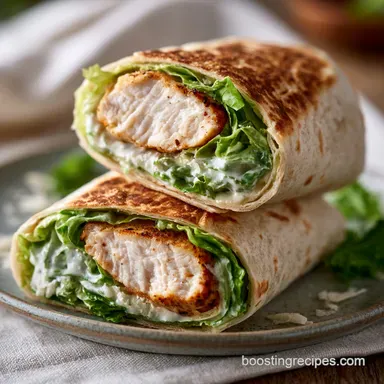
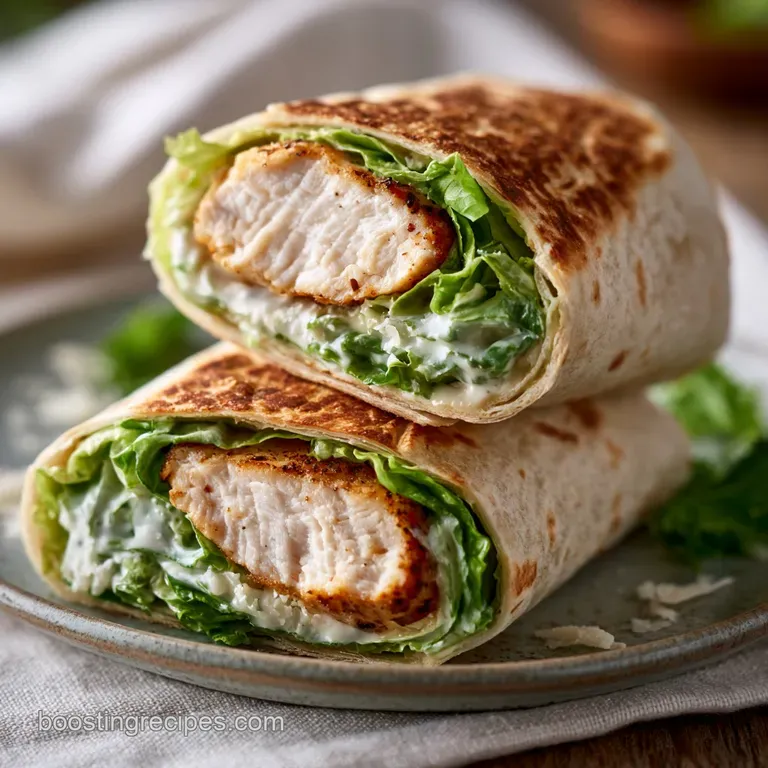
Crispy Chicken Caesar Wrap: Golden and Fresh

- Time: 15 min prep + 15 min cook = Total 30 minutes
- Flavor/Texture Hook: Shatter crisp chicken meets velvety Greek yogurt dressing
- Perfect for: Fast weeknight dinners or high protein meal prep
The sound of chicken hitting a hot air fryer basket is my favorite part of the day. That initial sizzle is the promise of a meal that doesn't taste like "diet food" even though we're swapping mayo for yogurt.
I used to think the only way to get that restaurant style crunch was to deep fry everything, but I've learned that a bit of olive oil and the right temperature do the heavy lifting.
I'll be honest, my first few attempts at a homemade wrap were a disaster. I would just pile the dressing and chicken onto the tortilla and roll it up. Five minutes later, I was eating a lukewarm, wet tube of bread. It was depressing. I realized the problem wasn't the ingredients, but the architecture.
That's why this Chicken Caesar Wrap is different. We're going to build it like a fortress, using the lettuce to shield the wrap from the sauce. You'll get a meal that stays tight and crisp, even if you're packing it for work.
It's the ultimate quick win for anyone who wants a "fancy" lunch without spending twenty bucks at a cafe.
The Secret Chicken Caesar Wrap Trick
The biggest mistake people make is neglecting the "moisture barrier." In any wrap, the sauce is the enemy of the tortilla. If the dressing touches the flour wrap directly, it begins to soak in immediately.
This leads to the dreaded "soggy bottom." By placing a thick layer of shredded romaine lettuce down first, we create a physical wall. The sauce sits on top of the lettuce, keeping the wrap dry and structural.
Another key is the chicken preparation. Most people just throw the chicken in, but patting it bone dry with paper towels is non negotiable. Water is the enemy of browning. If the chicken is damp, it steams instead of searing.
By drying the meat and using a over high heat air fryer setting, we get that shatter crisp exterior while keeping the inside juicy.
The dressing is where the budget smart magic happens. Instead of buying an expensive, preservative heavy bottled Caesar, we use plain Greek yogurt. It provides that same tangy punch and velvety mouthfeel as mayonnaise but with a better nutritional profile. According to Serious Eats, achieving the right internal temperature for poultry is the only way to ensure safety and juiciness, which is why we aim for exactly 165°F.
The Secret to the Crunch: Air frying removes surface moisture rapidly, which allows the paprika and garlic powder to fuse into a savory crust.
Why the Lettuce Goes First: Romaine acts as a waterproof lining, ensuring the tortilla stays flexible and dry for hours.
Yogurt vs. Mayo: Greek yogurt provides a sharper acidic bite that cuts through the richness of the parmesan, creating a more balanced flavor.
| Method | Time | Texture | Best For |
|---|---|---|---|
| Air Fryer | 12 min | Shatter crisp | Quick lunches |
| Pan Sear | 15 min | Golden brown | Small batches |
| Oven Bake | 20 min | Soft crisp | Large crowds |
Quick Recipe Specs
When you're in a rush, you don't want to guess. This recipe is designed for speed without sacrificing the "wow" factor. The total time of 30 minutes includes everything from the first paper towel pat to the final fold.
If you're wondering whether to go with a classic flour tortilla or something different, trust me, stick to the 10 inch flour wraps for this one. They have the elasticity needed to hold the ingredients without tearing. If you use a corn tortilla, it'll crack the moment you try to roll it.
Decision Shortcut:
- If you want maximum crunch, use the air fryer and crushed croutons.
- If you're watching calories, double the romaine and halve the parmesan.
- If you have extra time, grill the tortilla for 30 seconds before filling.
Inside Every Ingredient
Not every ingredient in a Chicken Caesar Wrap is just for flavor; some are there for the structure. For example, the Dijon mustard in the dressing isn't just for the zing, it acts as a stabilizer to keep the yogurt and lemon juice from separating.
The choice of romaine is also specific. We use romaine because it has a high water content in the ribs but a sturdy leaf structure. This gives you that fresh "snap" that contrasts with the tender chicken. If you used spinach, the wrap would feel too soft and lose its identity.
Component Analysis
| Ingredient | Science Role | Pro Secret |
|---|---|---|
| Greek Yogurt | Base/Emulsifier | Use full fat for a more velvety texture |
| Lemon Juice | Acid/Brightener | Use fresh lemon; bottled is too bitter |
| Paprika | Color/Flavor | Smoked paprika adds a "grilled" vibe |
| Parmesan | Salt/Umami | Shave it fresh for better melt/texture |
Right then, let's talk about the chicken. I always suggest thin strips. The more surface area you have, the more space there is for the spices to cling to and for the air fryer to crisp up. If you use thick chunks, you'll end up with a burnt outside and a raw center.
The Essential Gear
You don't need a professional kitchen to make this, but a few tools make it way easier. An air fryer is the star here, but if you don't have one, a convection oven works too. Just be prepared for a longer cook time.
I also recommend a whisk for the dressing. You can use a fork, but a whisk gets the air into the Greek yogurt, making it lighter and less "gloppy." For the chicken, a simple mixing bowl is all you need to ensure every strip is coated in that paprika garlic mixture.
The Gear List:
- Air Fryer (or oven with a wire rack)
- Medium mixing bowl
- Small whisk
- Paper towels (essential for drying the meat)
- Meat thermometer (to hit that 165°F mark)
Honestly, don't bother with fancy wrap folding tools. Your hands are the best tool for this. The trick is in the tension of the roll, which we'll cover in the assembly section.
Step-by-step Assembly
Let's crack on with the actual cooking. I've broken this down into three phases so you don't feel overwhelmed.
Phase 1: Achieving the Golden Crunch
First, pat the chicken strips completely dry with paper towels. Note: This prevents steaming and ensures a crisp exterior. In a bowl, toss chicken strips with olive oil, garlic powder, paprika, salt, and pepper until evenly coated.
Place chicken in the air fryer basket in a single layer. Air fry at 400°F (200°C) for 10–12 minutes. Flip them halfway through.
Cook until the chicken is golden and the internal temperature reaches 165°F (74°C).
Phase 2: Whisking the Zesty Dressing
While the chicken is sizzling, grab your mixing bowl. Whisk together the Greek yogurt, lemon juice, Dijon mustard, Worcestershire sauce, minced garlic, and grated parmesan.
Continue whisking until the mixture is velvety and smooth. If it feels too thick, add a teaspoon of water or extra lemon juice to loosen it up. Trust me, the Worcestershire sauce is the secret ingredient here; it adds a deep, savory note that mimics the anchovies found in traditional Caesar dressings.
Phase 3: The Strategic Assembly
Now for the architecture. Place a layer of shredded romaine lettuce in the center of each tortilla. Note: This is your moisture barrier.
Top the lettuce with your air-fried chicken. Drizzle the Caesar dressing over the chicken, then sprinkle with shaved parmesan and crushed croutons. Fold the sides of the tortilla inward and roll tightly to seal the wrap. Press down firmly on the seam to lock everything in.
Fixing Common Errors
Even with a simple Chicken Caesar Wrap, things can go sideways. Usually, it's a matter of temperature or timing. If your wrap feels "mushy," you've likely skipped the drying step or the lettuce barrier.
Troubleshooting Common Issues
| Issue | Solution |
|---|---|
| Why Your Wrap Is Soggy | This usually happens if the dressing is applied directly to the tortilla or if the chicken was still steaming when added. The steam turns into water, which softens the flour wrap. |
| Why Your Chicken Is Rubbery | Overcooking chicken breast is a classic mistake. If you go past 165°F, the proteins tighten up too much, squeezing out all the moisture. Use a thermometer to pull them out the second they hit the targ |
| Why Your Dressing Is Too Tart | Too much lemon juice can overpower the creaminess of the yogurt. If this happens, whisk in an extra tablespoon of grated parmesan or a pinch of sugar to balance the acidity. Troubleshooting Guide |
Common Mistakes Checklist:
- ✓ Did you pat the chicken completely dry?
- ✓ Is the lettuce layer thick enough to cover the base?
- ✓ Did the chicken reach exactly 165°F?
- ✓ Is the dressing whisked until velvety?
- ✓ Did you fold the sides in before rolling?
Smart Ingredient Swaps
Since we're keeping this budget friendly, you can play around with what's in your pantry. The beauty of the Chicken Caesar Wrap is that it's very forgiving. If you don't have Greek yogurt, you can use sour cream, though it's a bit heavier.
If you're looking for a different vibe entirely, you might prefer something with a bit more heat, like Asian Chicken Wraps, which use a zesty peanut sauce instead of the creamy Caesar.
Substitution Table
| Original Ingredient | Substitute | Why It Works |
|---|---|---|
| Greek Yogurt (1/2 cup) | Sour Cream (1/2 cup) | Similar thickness. Note: Less tangy, richer taste |
| Romaine Lettuce | Kale (massaged) | Same crunch. Note: Earthier flavor, holds up longer |
| Flour Tortilla | Whole Wheat Wrap | More fiber. Note: Denser texture, less flexible |
| Parmesan Cheese | Pecorino Romano | Similar saltiness. Note: Sharper, more pungent flavor |
Adjusting Your Portions
If you're making this for just yourself, simply halve all ingredients. Be careful with the air fryer; a single chicken breast takes about the same time as two, but keep a closer eye on it so it doesn't overdry.
When scaling up for a party (4-6 people), don't just quadruple the salt. Increase the spices to 1.5x or 2x and work in batches in the air fryer. If you crowd the basket, the chicken will steam instead of crisp, and you'll lose that shatter effect.
For the dressing, you can easily double the batch and store it in the fridge for a few days.
Storage and Freshness
The biggest challenge with a Chicken Caesar Wrap is storage. Because of the fresh lettuce and dressing, these are best eaten immediately. However, if you're meal prepping, there's a trick to it.
Store the components separately. Keep the air-fried chicken in one container, the dressing in a small jar, and the lettuce/tortilla in another. When you're ready to eat, assemble it in 60 seconds. This keeps the chicken from getting rubbery and the lettuce from wilting.
Storage Guidelines:
- Chicken: Fridge for 3 days, Freezer for 1 month.
- Dressing: Fridge for 5 days in an airtight jar.
- Assembled Wrap: Eat within 2 hours (or it will get soggy).
Zero Waste Tips: Don't throw away the leftover Greek yogurt or the stems of the romaine. Use the remaining yogurt as a base for a dip or stir it into oatmeal for extra protein. Romaine stems can be chopped finely and added to a stir fry or a soup for an unexpected crunch.
If you have leftover chicken, it's a great addition to a morning omelet.
Best Serving Ideas
A Chicken Caesar Wrap is a meal in itself, but a few sides can make it feel like a full feast. I love pairing these with a side of sweet potato fries or a simple fruit salad to cut through the richness of the parmesan.
For a real pro move, serve the wrap with a side of dipping sauce. While the wrap has dressing inside, a little extra on the side is always a win. If you want something a bit more zesty and herb forward to dip your chicken in, a small bowl of Easy Chimichurri Sauce provides a brilliant contrast to the creamy Caesar flavors.
You can also customize the inside based on the season. In the summer, add some sliced cucumbers for extra hydration. In the winter, try adding some grilled sun dried tomatoes for a deeper, more concentrated sweetness.
Honestly, the best way to enjoy this is while it's still warm. The contrast between the hot, crispy chicken and the cold, crisp lettuce is what makes the dish. If you've stored it in the fridge, don't microwave the whole wrap. Instead, reheat the chicken separately, then assemble.
Microwaving lettuce is a crime against food!
This recipe proves that you don't need a huge budget or a lot of time to make something that feels high end. By focusing on a few key techniques - like the moisture barrier and the air fryer sear - you can turn basic ingredients into a restaurant quality meal.
The next time you're craving a Chicken Caesar Wrap, skip the takeout. You've got the secret to the crunch and the trick to the structure. Just remember: dry your chicken, build your lettuce wall, and don't overcook that poultry. Happy cooking!
Recipe FAQs
How do you get the chicken extra crispy?
Pat the chicken strips completely dry with paper towels before seasoning. Removing surface moisture prevents the meat from steaming, allowing it to sear perfectly at 400°F (200°C).
How do I prevent my wrap from getting soggy?
Place a layer of shredded romaine lettuce directly on the tortilla first. This creates a moisture barrier that protects the flour wrap from the dressing and chicken juices.
How do I make the actual wrap crispy?
Sear the assembled wrap in a pan over medium heat. Toast each side for 1-2 minutes until the tortilla is golden brown and sealed.
Is it true that cooking chicken past 165°F makes it more tender?
No, this is a common misconception. Going beyond 165°F (74°C) causes proteins to tighten and squeeze out moisture, resulting in rubbery meat.
How do I assemble the wrap for the best structure?
Layer the ingredients starting with lettuce, then chicken, dressing, and toppings. Fold the sides inward and roll tightly to ensure the wrap stays sealed.
Can I prepare these wraps in advance for meal prep?
Yes, but store the components separately. Keep the chicken, dressing, and lettuce in different containers to prevent wilting; if you need more meal prep inspiration, try our chicken adobo.
How do I make the Caesar dressing creamy without eggs?
Whisk Greek yogurt with lemon juice, Dijon mustard, and parmesan until velvety. This provides a thick, rich consistency while using simple pantry staples.
Crispy Chicken Caesar Wrap