Quick Peanut Butter Bars: No Bake and Fudgy
- Time:15 minutes active + 1 hour chilling = Total 1 hour 15 mins
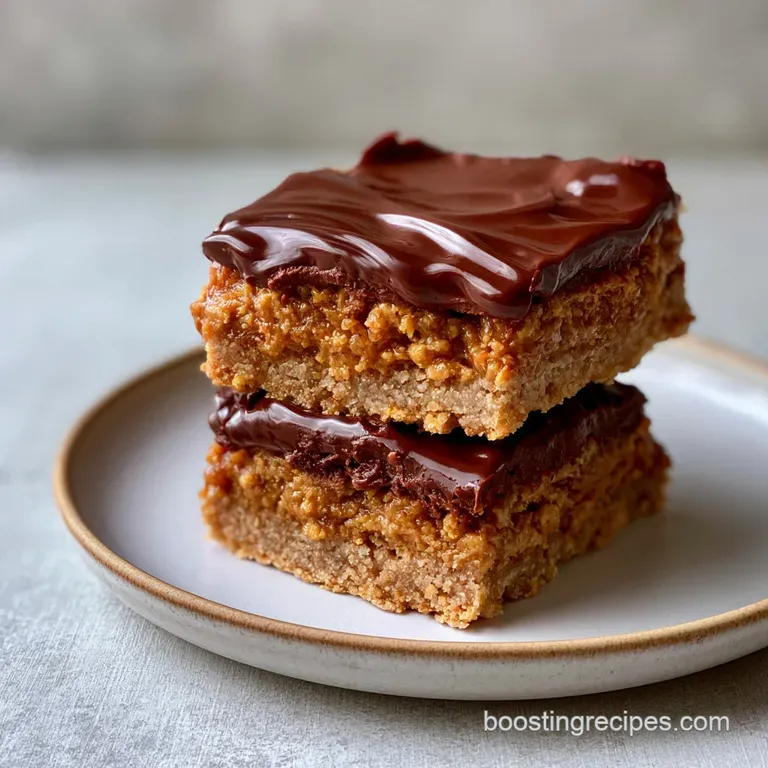
- Flavor/Texture Hook: Velvety peanut butter base with a chocolate layer that has a clean shatter
- Perfect for: Last minute parties, school treats, or high energy snacking
How to Make Peanut Butter Bars
That specific sound is what I live for - the sharp, clean snap of a chilled chocolate layer breaking under a knife. I remember the first time I brought these to a neighborhood potluck. Everyone assumed I'd spent hours in the kitchen or, more likely, bought them from a high end bakery.
When I told them it took me 15 minutes of actual work and a fridge, I saw a few people genuinely confuse me for a magician.
The biggest myth about these treats is that you need an oven to get that dense, fudge like consistency. Actually, baking often makes peanut butter desserts too cakey or dry. By keeping everything raw and setting it in the cold, you preserve the silky oils of the peanut butter.
It gives you a texture that is far more indulgent than anything a timer can produce.
These Peanut Butter Bars are essentially a shortcut to luxury. You're combining simple pantry staples, but the result is a sophisticated balance of salt and sugar. Since we aren't dealing with leavening agents or oven temperatures, the only real "skill" here is patience while they chill.
Trust me on this, don't try to cut them early or you'll end up with a delicious mess instead of neat squares.
Why These Bars Work
- Fat Based Structure: The butter and peanut butter act as the "glue" that hardens when chilled, removing the need for flour or eggs.
- Sugar Dissolution: Using powdered sugar instead of granulated ensures a velvety mouthfeel without any gritty crystals.
- Temperature Control: Heating the chocolate in bursts prevents the fats from separating, keeping the topping glossy.
- Moisture Barrier: The dense base prevents the chocolate from soaking in, which keeps the layers distinct and clean.
| Method | Time | Texture | Best For |
|---|---|---|---|
| No Bake | 15 mins active | Fudgy and dense | Quick cravings |
| Baked | 45 mins active | Cakey and soft | Tea time |
| Freezer | 10 mins active | Hard and icy | Summer heat |
Ingredient Deep Dive
Understanding your components helps you avoid a crumbly mess. Since there's no baking involved, the quality of your fats determines the final set.
| Ingredient | Science Role | Pro Secret |
|---|---|---|
| Unsalted Butter | Primary binder | Melt slowly to avoid bubbling |
| Powdered Sugar | Sweetener/Stabilizer | Sift it if you see lumps |
| Peanut Butter | Flavor/Structure | Use a brand with no added oils |
| Semi sweet Chips | Hardening agent | High cocoa butter content gives a better snap |
Everything You'll Need
Grab these items from your pantry. I've listed the exact weights because volume can be tricky with peanut butter.
- 225 g unsalted butter, melted Why this? Provides the necessary fat for the base to set firmly.
- 200 g graham cracker crumbs Why this? Adds a subtle honey wheat flavor and structural grit.
- 240 g powdered sugar Why this? Melts instantly into the fats for a smooth finish.
- 250 g creamy peanut butter (for the base) Why this? The main flavor profile and secondary binder.
- 255 g semi sweet chocolate chips Why this? Creates the firm top layer.
- 60 g creamy peanut butter (for the topping) Why this? Keeps the chocolate from being too brittle.
If you're looking for other easy peanut butter desserts, this is a great start, but you might also love a creamy mousse or a peanut butter swirl cheesecake.
| Original Ingredient | Substitute | Why It Works |
|---|---|---|
| Graham Crumbs | Almond Flour | Grain free. Note: Results in a softer, nuttier base |
| Powdered Sugar | Maple Sugar | Natural sweetener. Note: Slightly grainier texture |
| Semi sweet Chips | Dark Chocolate | Bolder flavor. Note: More bitter, less sweet |
| Butter | Coconut Oil | Vegan option. Note: Must keep bars refrigerated or they'll melt |
Right then, let's talk tools. You don't need a stand mixer or any fancy gadgets for this. A medium bowl, a spatula, and a microwave safe dish are all that stand between you and a tray of treats. I usually use an 8x8 inch pan, but any square dish works as long as you line it with parchment paper.
The Essential Gear
You only need the basics here. I prefer a silicone spatula because it lets me scrape every single bit of chocolate out of the bowl - no waste allowed.
- 8x8 inch square baking pan
- Parchment paper (essential for lifting the bars out)
- Medium mixing bowl
- Microwave safe glass bowl
- Offset spatula or flat knife for spreading
Step-by-step Assembly

Let's crack on with the actual making. Follow these steps exactly to ensure your layers don't bleed into each other.
- Melt the butter. Use a microwave or stovetop until completely liquid but not boiling.
- Mix dry ingredients. Stir the 200 g graham cracker crumbs and 240 g powdered sugar in your medium bowl Note: Sift the sugar if it's clumped.
- Blend the base. Stir in the melted butter and 250 g of creamy peanut butter. Mix until the color is uniform and the texture feels like wet sand.
- Press the base. Firmly pack the mixture into the bottom of your parchment lined pan. Use the bottom of a glass to press it down until it's flat and compact.
- Prep the chocolate. Place 255 g chocolate chips and 60 g peanut butter in a microwave safe bowl.
- Melt in bursts. Heat for 30 seconds, stir, and repeat until the chocolate is glossy and smooth.
- Layer the top. Pour the warm chocolate mixture over the peanut butter base. Spread it evenly with your spatula Note: Work quickly before it begins to set.
- Set in cold. Place the pan in the refrigerator for at least 1 hour until the top is firm to the touch.
- Final slice. Lift the parchment paper to remove the block from the pan. Slice into 30 small squares using a sharp knife.
If you're in the mood for something different after these, my Double Chocolate Banana Cupcakes are another great way to satisfy a chocolate craving.
Fixing Common Mistakes
Even the best home cooks hit a snag now and then. Most issues with Peanut Butter Bars come down to temperature or ratios.
Why Your Base Is Crumbly
If the base doesn't hold together, you likely didn't press it down hard enough or your butter wasn't fully melted. The fats need to coat every crumb to create a cohesive slab.
Preventing Chocolate Separation
If your topping looks oily or grainy, you've overheated the chocolate. This happens when the cocoa solids separate from the fat. To fix this, stir in a teaspoon of creamy peanut butter or a splash of milk to bring it back together.
Stopping the Soggy Middle
This usually happens if you don't let the base set for a minute before adding the warm chocolate, or if you use a peanut butter that is too oily. Always use a standard creamy brand rather than "natural" styles that require stirring.
| Problem | Root Cause | Solution |
|---|---|---|
| Base too soft | Too much butter | Add 20g more graham crumbs |
| Chocolate won't snap | Not chilled enough | Return to fridge for 30 mins |
| Hard to slice | Knife is too warm | Dip knife in hot water, then wipe dry |
Common Mistakes Checklist
- ✓ Did you line the pan with parchment? (Crucial for removal)
- ✓ Is the butter fully melted? (Prevents lumps in the base)
- ✓ Did you stir the chocolate every 30 seconds? (Prevents burning)
- ✓ Did you press the base firmly? (Prevents crumbling)
- ✓ Is the fridge cold enough? (Ensure bars are fully set)
Changing the Recipe
You can easily tweak this to fit your diet. Because this is a no bake recipe, it's surprisingly flexible.
Making it Vegan
Swap the butter for refined coconut oil (which is solid at room temperature) and use a dairy-free chocolate chip. The structure stays almost identical.
Going gluten-free
Use gluten-free graham cracker crumbs or crushed rice cereal. According to the USDA FoodData, different grain substitutes can alter the calorie count slightly, but the texture remains fudgy.
Adding a Salty Crunch
Fold 50 g of crushed roasted peanuts into the base before pressing it into the pan. This adds a shatter like texture to every bite.
Using Dark Chocolate
If semi sweet is too sugary, use 70% dark chocolate. This cuts through the richness of the peanut butter and makes the treats feel more adult.
Adjusting the Batch Size
Depending on the crowd, you might need to scale these up or down.
Scaling Down (Half Batch) Use a loaf pan instead of a square pan. Reduce the chilling time by about 20%, as a smaller mass cools faster. If you're using a recipe that calls for an egg (though this one doesn't), beat one egg and use half.
Scaling Up (Double Batch) Double all ingredients but only increase the salt or vanilla (if adding) by 1.5x to keep flavors balanced. I recommend working in two separate batches for the chocolate melting process, as a massive bowl of chocolate can heat unevenly in the microwave.
For baking, you'd lower the temp, but since these are no bake, just ensure your fridge has enough airflow around the pans.
| Desired Result | Action | Impact |
|---|---|---|
| Extra Fudgy | Increase PB by 10% | Heavier, denser bite |
| More Crunch | Add 1/4 cup oats | Heartier texture |
| Less Sweet | Use 80% Dark Choc | More bitter profile |
Debunking Dessert Myths
There are a few things people get wrong about no bake treats. Let's set the record straight.
The "Unhealthy" Myth: Many think no bake means "unhealthy." While these are treats, you can control the sugar levels and use natural nut butters to increase the protein and healthy fat content.
The "Low Quality" Myth: Some believe that without the Maillard reaction (the browning that happens in ovens), you lose flavor. In reality, the raw fats in these bars provide a purity of peanut flavor that baking actually masks.
Keeping Bars Fresh
These bars are quite stable because of the high fat and sugar content, but they do need a cool environment.
Storage Guidelines Keep them in an airtight container in the fridge for up to 7 days. If you leave them on the counter, the butter will soften and the bars will lose their shape.
Freezing for Later These freeze beautifully for up to 3 months. Wrap them individually in wax paper and place them in a freezer bag. To eat, just pop one in the fridge for 20 minutes or eat it straight from the freezer for a candy bar experience.
Zero Waste Tips Don't waste the chocolate streaks left in your melting bowl. Stir in a teaspoon of warm milk or cream to create a quick ganache, then drizzle it over some sliced apples. If you have leftover graham crumbs, toast them in a pan with a bit of cinnamon to make a topping for yogurt.
Serving and Enjoying
To get the best experience, I recommend serving these slightly chilled. If they are too cold, the peanut butter flavor is muted; if they are too warm, they get sticky.
Pair these with a sharp cup of black coffee or a glass of cold almond milk. The bitterness of the coffee cuts through the velvety fat of the peanut butter perfectly. For a party platter, arrange them in a grid and dust the top with a tiny pinch of flaky sea salt to make the chocolate pop.
If you love the flavor combination of peanut and chocolate, you might also enjoy my Asian Chicken Wraps which uses a similar peanut base but in a savory, zesty way. It's a great way to see how versatile peanut butter can be in the kitchen.
These 15 Minute Peanut Butter Bars are the ultimate "emergency" dessert. Whether you're hosting a last minute get together or just need a midnight snack, they deliver a professional level taste with almost zero effort.
Just remember: don't skip the parchment paper, and for the love of all things sweet, wait the full hour before slicing. Enjoy!
Recipe FAQs
Is a spoonful of peanut butter a good late night snack?
Yes, in moderation. The combination of healthy fats and protein helps maintain satiety and can prevent midnight hunger wakes.
How do you keep no-bake bars from crumbling?
Press the base firmly into the pan. Use the bottom of a flat glass or a spatula to pack the mixture tightly so the ingredients bond before adding the chocolate.
What causes crumbly peanut butter bars?
Insufficient binding or light pressing. If the melted butter isn't fully incorporated or the base isn't packed down, the bars will lack the structural integrity needed for clean slices.
What are common no-bake bar mistakes?
Overheating the chocolate and rushing the chill time. Scorching the chocolate in the microwave creates a grainy texture, while slicing before the 1-hour mark leads to melted edges.
Can I use chunky peanut butter instead of creamy?
Yes, but the texture changes. Chunky peanut butter adds a pleasant crunch, though the base is slightly less cohesive. If you enjoy that kind of added texture, you might also like our blueberry scones.
How long do these bars need to set in the fridge?
Chill for at least 1 hour. This ensures the chocolate layer is completely firm, allowing you to lift the parchment paper and cut precise squares.
Do I need to bake these bars?
No, these are completely no-bake. The structure is achieved through the refrigeration of the butter and chocolate rather than oven heat.
No Bake Peanut Butter Bars

