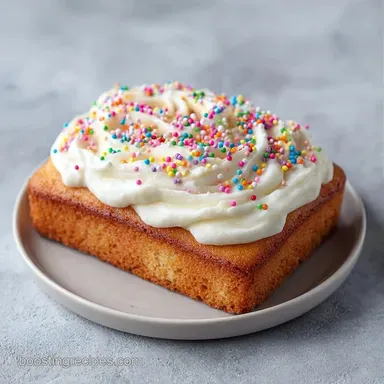
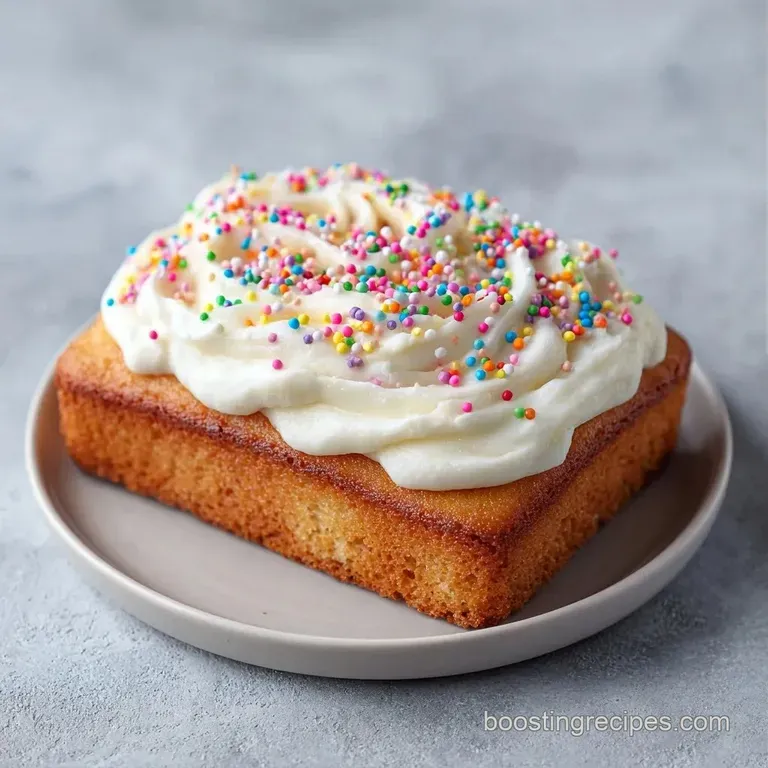
Simple Nursing Grad Sheet Cake: Fluffy and Buttery
- Time: 20 min active + 1 hour cooling
- Flavor/Texture Hook: Velvety buttercream on a fluffy, buttery vanilla base
- Perfect for: Graduation parties, clinic celebrations, or nursing school send offs
The smell of warm vanilla and melted butter hitting the air is basically the official scent of "we finally made it." There is nothing quite like that moment when you pull a gold brown sheet cake out of the oven and realize it didn't sink in the middle.
But let's be real, the biggest nightmare with a cake like this is the "mountain" effect, where the center rises way higher than the edges. When you're trying to pipe a clean stethoscope or a nursing cap, a domed cake is your worst enemy because your frosting just slides right off the slopes.
I learned this the hard way at a family party. I spent two hours on the decorations only to have the whole design shift because the cake wasn't level. This Simple Nursing Grad Sheet Cake is the fix for that.
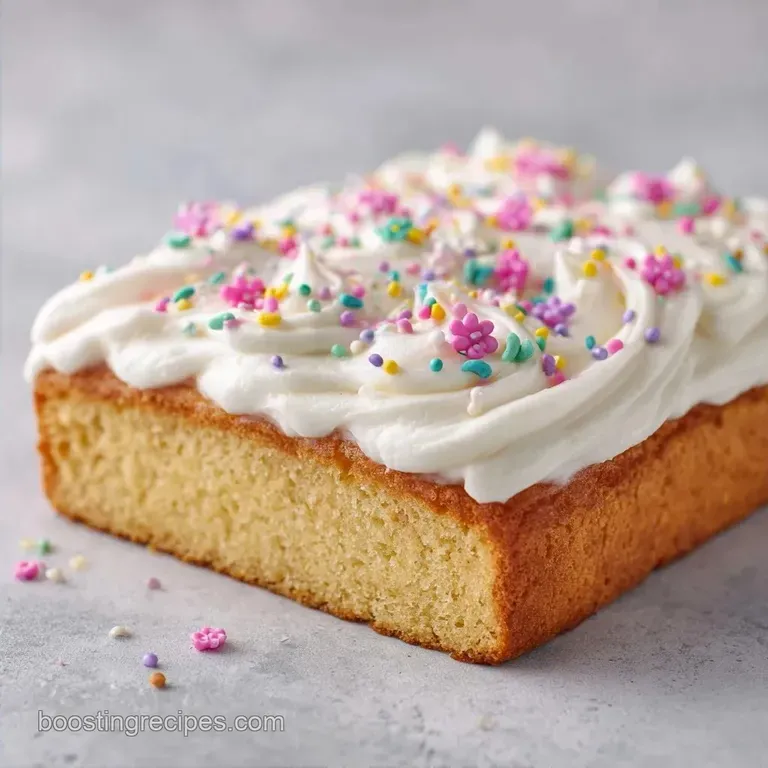
It uses a specific mixing method that keeps the crumb tight and the top flat, meaning you have a perfect, level canvas for all those medical themed decorations without needing to spend an hour hacking the top off with a serrated knife.
We're going for a classic, crowd pleasing vanilla profile. It's a cake that feels nostalgic but tastes professional. Whether you're celebrating a new RN, an LPN, or a NP, this is the kind of dessert that feeds a huge group without making you spend your entire graduation weekend in the kitchen.
It's all about reliability and a finish that looks like it came from a bakery, even if you've never used a piping bag in your life.
The One Thing That Changes Everything
When it comes to a Simple Nursing Grad Sheet Cake, the secret isn't in the sugar or the flour, but in the temperature of your ingredients. If you've ever had a cake that felt "rubbery" or didn't rise evenly, it's usually because the eggs were ice cold.
Cold eggs shock the creamed butter, causing it to seize and break the emulsion. When that happens, you lose those tiny air pockets, and the cake ends up dense instead of fluffy.
Room Temp Magic: Warm ingredients bond together more easily, creating a smooth batter that traps air for a better lift.
The Creaming Phase: Beating butter and sugar until pale isn't just for show, it physically pushes air into the fat.
Low Speed Mixing: Once the flour goes in, mixing on low prevents gluten from over developing, which stops the cake from getting tough.
The Cooling Gap: Letting the cake cool for a full hour prevents the buttercream from melting into a puddle of blue soup.
Right then, let's look at why you'd choose to make this from scratch versus taking a shortcut. Most people think a boxed mix is "close enough," but for a celebratory event, the texture difference is huge. A scratch cake holds up better under the weight of heavy buttercream and fondant decorations.
| Feature | Fresh Scratch Method | Box Mix Shortcut | Impact |
|---|---|---|---|
| Texture | Velvety and tight crumb | Airy and slightly spongy | Scratch is better for piping |
| Flavor | Pure butter and vanilla | Artificial vanilla notes | Scratch tastes "homemade" |
| Stability | Firm, supports weight | Can be fragile/crumbly | Scratch handles fondant better |
It's a bit more work up front, but the results are just different. You get a cake that doesn't taste like a chemistry experiment, which is probably a relief for someone who just spent four years studying actual chemistry and pharmacology.
Component Analysis
To understand why this cake stays so moist, we have to look at the roles of the main ingredients. I've always been curious about why some cakes dry out while others stay soft for days. It usually comes down to the ratio of fat to flour. According to the guides at King Arthur Baking, the way we handle the flour directly affects the tenderness of the final crumb.
| Ingredient | Science Role | Pro Secret |
|---|---|---|
| All Purpose Flour | Provides structure | Sift it to avoid clumps in the batter |
| Unsalted Butter | Adds moisture/flavor | Use high fat European style for richer taste |
| Powdered Sugar | Stabilizes frosting | Sift it, or you'll have lumps in your piping |
| Heavy Cream | Adds silkiness | Add one tablespoon at a time to control stiffness |
I once tried using salted butter in the frosting because I ran out of unsalted. Honestly, don't even bother with that. The salt in the butter clashes with the sweetness of the powdered sugar and leaves a weird, savory aftertaste that just doesn't work for a celebration cake.
Stick to the unsalted butter and add that pinch of fine salt manually to balance the sugar.
Ingredients
Here is everything you'll need. Make sure your butter and eggs are sitting out on the counter for at least 60 minutes before you start.
For the Cake Base:
- 3 cups (375g) all purpose flourWhy this? Balanced protein for structure and tenderness
- 2 cups (400g) granulated sugarWhy this? Standard sweetness and moisture retention
- 1 tbsp (12g) baking powderWhy this? Provides a consistent, vertical lift
- 1/2 tsp (3g) saltWhy this? Enhances the vanilla and butter notes
- 3/4 cup (170g) unsalted butter, softenedWhy this? Creates the essential air pocket emulsion
- 1 cup (240ml) whole milk, room temperatureWhy this? Fat content ensures a velvety crumb
- 4 large eggs, room temperatureWhy this? Acts as the binder and provides lift
- 2 tsp (10ml) pure vanilla extractWhy this? Classic, warm aromatic profile
For the Buttercream & Decor:
- 2 cups (450g) unsalted butter, softenedWhy this? The structural base of the frosting
- 6 cups (720g) powdered sugar, siftedWhy this? Gives that smooth, pipeable consistency
- 3 tbsp (45ml) heavy creamWhy this? Adjusts the viscosity for piping
- 1 tsp (5ml) clear vanilla extractWhy this? Flavor without tinting the white frosting
- 1 pinch (1g) saltWhy this? Cuts through the heavy sweetness
- 2 tbsp (30ml) blue gel food coloringWhy this? Gel is more concentrated than liquid
- 1 tbsp (15ml) red gel food coloringWhy this? For the heart accents
- 4 oz (115g) white fondantWhy this? Easiest way to make a clean medical icon
Substitution Options:
| Original Ingredient | Substitute | Why It Works |
|---|---|---|
| Whole Milk | Buttermilk | Same moisture, but adds a slight tang. Note: Makes cake slightly denser |
| All Purpose Flour | Cake Flour | Lower protein for a softer, finer crumb. Note: Use 1.25 cups for every 1 cup AP |
| Heavy Cream | Full fat Coconut Milk | Similar fat content. Note: Adds a subtle coconut flavor |
| Powdered Sugar | Caster Sugar (pulsed) | Fine crystals provide sweetness. Note: Texture will be grittier, not smooth |
Equipment Needed
You don't need a professional kitchen to pull off a Simple Nursing Grad Sheet Cake. I'm a big believer in using what you have. If you don't have a stand mixer, a hand mixer works just fine, though your arm might get a workout during the frosting stage.
- 13x9 inch baking pan (metal is best for even browning)
- Electric hand mixer or stand mixer (such as KitchenAid)
- Large mixing bowl
- Offset spatula (this is the real hero for smooth frosting)
- Parchment paper (for the stencils)
- Piping bags and small round tips
- Measuring cups and a kitchen scale (for precision)
Chef's Note: If you don't have an offset spatula, the back of a large spoon can work, but it's much harder to get that perfectly flat surface. You can actually make a makeshift one by bending a piece of stiff cardboard and covering it in foil.
Bringing It Together
Let's get into the process. This is broken down into the bake, the frost, and the art.
Phase 1: The Fast Bake Base
- Preheat your oven to 350°F (175°C) and grease your 13x9 inch pan thoroughly. Note: Grease the corners well so the cake doesn't stick.
- Cream the softened butter (170g) and granulated sugar in a bowl until the mixture looks pale and fluffy. Do this for about 3-5 minutes.
- Beat in the eggs one at a time. Note: Wait until each egg is fully incorporated before adding the next.
- Stir in the pure vanilla extract.
- Alternately add the flour, baking powder, salt, and milk. Start and end with the flour, mixing on low speed until just combined.
- Pour the batter into the pan and smooth it out. Bake for 30 minutes until the edges pull away from the sides and a toothpick comes out clean.
- Let the cake cool in the pan for 1 hour. Note: Do not frost a warm cake, or your buttercream will melt.
Phase 2: The Velvety Frosting Layer
- Beat the frosting butter (450g) on medium high for 3-5 minutes until it's nearly white in color.
- Gradually add the powdered sugar and salt on low speed so you don't end up in a cloud of sugar.
- Pour in the heavy cream and clear vanilla extract. Whip on high for 2 minutes until stiff, glossy peaks form.
- Spread a thick, even layer of buttercream across the cooled cake using your offset spatula.
Phase 3: The "Medical Grade" Decorating
- Trace a stethoscope or a nursing cap on parchment paper and cut it out to create a stencil. Place the stencil firmly on the cake.
- Mix a portion of the buttercream with blue gel coloring. Pipe the blue tinted frosting inside the stencil, then carefully lift the paper to reveal the icon.
- Using a small round tip, pipe "Congrats, RN!" or the name along the bottom edge. Add a few red heart accents in the corners for a pop of color.
Troubleshooting Guide
Even the best of us have cake disasters. The most common issue I see with this Simple Nursing Grad Sheet Cake is the frosting consistency. If it's too runny, your nursing icons will just bleed into the white background.
| Issue | Solution |
|---|---|
| Why Your Frosting is Too Soft | This usually happens if the butter was too warm or if you added too much heavy cream. The frosting should be stiff enough to hold a peak but soft enough to spread. |
| Why Your Cake Domes in the Center | If your cake has a hump, it's likely because the oven was too hot or you over mixed the batter. Over mixing develops too much gluten, which pushes the cake up in the center. |
| Why the Stencil Smudged | Smudging happens when the frosting is too soft or when you lift the stencil too quickly. |
Common Mistakes Checklist:
- ✓ Did you use room temperature eggs?
- ✓ Did you avoid over mixing the flour?
- ✓ Did you let the cake cool for a full hour?
- ✓ Is the buttercream whipped until pale white?
- ✓ Did you lift the stencil straight up?
Mix It Up
If you want to change the flavor profile, this base is incredibly versatile. For a chocolate loving grad, you can swap 1/2 cup of the flour for high-quality cocoa powder. Just make sure to increase the milk by a tablespoon to compensate for the cocoa's drying effect.
If you're looking for something even more colorful, you could try a Homemade Strawberry Cake Recipe for a bright, fruity alternative. The strawberry base works beautifully with a white chocolate buttercream, and you can still use the same stethoscope stencils for that nursing theme.
Decision Shortcut:
- If you want a cleaner look, use fondant for the stethoscope.
- If you want a rustic look, use a palette knife to "paint" the frosting.
- If you're short on time, use a pre made white frosting and just add your own gel colors.
For those who want to go all out, you can add a layer of lemon curd or raspberry jam between the cake and the frosting. Just make sure the jam is spread thin so it doesn't create a "slip layer" that makes the frosting slide off the Simple Nursing Grad Sheet Cake.
Make-ahead and Leftover Tips
One of the best things about a sheet cake is how well it stores. You can actually bake the cake base a day in advance. Once it's completely cool, wrap it tightly in plastic wrap and keep it at room temperature.
I find that a "day old" cake is actually easier to frost because the crumb has set, meaning fewer crumbs get mixed into your white buttercream.
Storage Guidelines: - Fridge: Store in an airtight container for up to 5 days. Let it sit at room temperature for 30 minutes before eating to let the butter soften back up. - Freezer: You can freeze the unfrosted cake layers for up to 3 months.
Wrap them in double plastic wrap and foil. Thaw in the fridge overnight before frosting.
Zero Waste Tips: If you ended up trimming the top of the cake to make it perfectly flat, don't throw those scraps away! Crumble the cake bits into a bowl, mix with a spoonful of frosting and some sprinkles, and you've got "cake pops" for the kids at the party.
You can also use leftover buttercream as a dip for fresh strawberries or apple slices.
How to Serve and Enjoy
When it's time to serve the Simple Nursing Grad Sheet Cake, use a hot knife. Run your knife under hot water, wipe it dry, and then make your cuts. This ensures a clean, sharp edge on every square and keeps the frosting from dragging across the cake.
Since this cake is quite rich, I love serving it with a side of fresh berries or a dollop of unsweetened whipped cream. It cuts through the sweetness of the buttercream and makes the whole plate feel a bit more balanced.
For the presentation, place the cake on a large white platter and scatter some real medical props around the base maybe a few clean syringes (without needles, obviously!) or some rolled up bandages. It adds a fun, immersive touch to the party table that the graduate will love.
Trust me on this, the photos will look way better when the theme extends beyond just the cake.
Right then, you've got everything you need to create a dessert that's as impressive as the degree being celebrated. Just remember: room temp ingredients, low speed mixing, and a lot of patience with the stencil. You've got this!
Recipe FAQs
How to make a graduation cake from scratch?
Cream butter and sugar, then alternate adding dry ingredients and milk. Bake at 350°F for 30 minutes in a 13x9 inch pan before frosting with stiff buttercream.
What is a good quote for a nursing graduate?
Choose something short and inspiring about care. Phrases like "Healing Hands, Caring Heart" are easy to pipe along the bottom edge of the cake.
What should a grad cake say?
Keep the message clear and celebratory. "Congrats, RN!" or the graduate's name followed by their new credentials are the most popular choices.
What are some DIY nurse graduation gifts?
A custom sheet cake is a meaningful handmade option. Combine it with other treats, like my blueberry scones, for a complete party spread.
What is a good gift for a new grad nurse?
Practical items like high-quality scrubs or a personalized stethoscope case are ideal. Themed desserts like this cake provide a great way to celebrate the achievement socially.
Why is my frosting too soft to hold the nursing icons?
The butter was likely too warm or too much heavy cream was added. Stiff buttercream is required to ensure the blue tinted icons don't bleed into the white background.
Why did my cake dome in the center?
The oven temperature was likely too high. This causes the edges to set too quickly, forcing the batter in the center to rise upward.
Simple Nursing Grad Sheet Cake